Screen printing has been around for decades, used to make everything from posters and banners to fabric designs. Unlike digital printing, screen printing delivers a unique, authentic look, with prints that are both strong and durable
That’s why it’s a go-to method for creating branded souvenirs, where quality prints really matter. The key to getting great results lies in the tools and materials you use, which are essential for transferring images onto your products. So, what do you need to get started? Let’s take a look.
Screen Printing Tools and Materials
1. Screen Printing Screen
In screen printing, the ink needs to flow through a screen to transfer onto the material. This is where the screen printing screen comes in. It’s typically a mesh fabric stretched over a wooden frame, which controls how much ink passes through.
Screens come in various sizes, which you can adjust based on your needs. Just make sure the screen is larger than the design you’re printing. The fabric’s mesh count, measured in units like T90 to T150, determines the thickness and how fine the print will be.
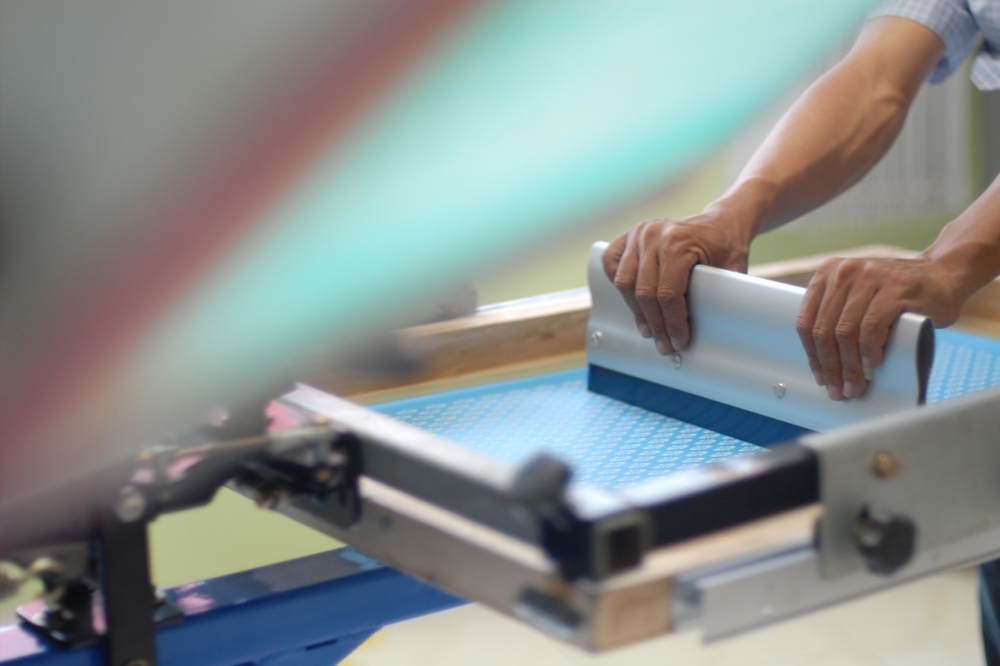
2. Screen Printing Squeegee
The squeegee is a key tool in screen printing, used to spread and press ink through the screen onto the material. There are six main types: flat, round, blunt, beveled, square, and tapered. The blade is usually made of rubber, while the handle is typically wood or aluminum.
3. Screen Printing Table
As the name suggests, the screen printing table is where the printing happens. It’s also known as a standard table, relay table, or double-pin table, so you might see it called different things.
There’s also an exposure table, which has built-in lights to help with the screen exposure process. Most use TL fluorescent lamps, but regular incandescent bulbs can work as well.
4. Tracing Paper
Tracing paper is used to create design patterns that are transferred onto the screen. If you don’t have tracing paper, regular printer paper (HVS paper) can work in a pinch.
5. Screen Printing Film
Screen printing film is what holds the design or text that will be transferred onto the screen. You can create the film either manually or using computer software.
6. Screen Printing Ink
Screen printing ink is essential to the process, as it determines the sharpness, vibrancy, and durability of your prints. Popular options include plastisol, rubber, image armor, superwhite, and Dupont Artisi inks.
7. Afdruk
Afdru is a material used to coat the screen fabric, enabling the film design to transfer onto the screen after drying. To apply the afdruk evenly, you’ll need a coater, which is typically made of aluminum or stainless steel.
8. Photo Emulsion
Photo emulsion is a thick, light-sensitive liquid that covers the pores of the screen fabric. Once exposed to light, it hardens, creating a stencil on the dried screen.
9. Water Sprayer
After exposing the design film onto the screen, use a water sprayer to wash away the excess emulsion, revealing the design. This step removes any emulsion that isn’t part of the final print.
10. Heat Gun
A heat gun is a handy tool for speeding up the drying process of your prints. Since proper drying requires sufficient heat, the heat gun helps get the job done quickly and efficiently.
Screen Printing Process
Here’s how screen printing works using the tools and materials we've covered. First, coat the screen with a thin layer of liquid emulsion in a dark room. Use a squeegee to apply the emulsion and let it dry.
Then, create your design on a transparent sheet, like tracing paper or regular printer paper (HVS paper). Place the design on the screen and press it onto the dried emulsion.
Expose the screen to ultraviolet light or let it dry until the design shows up. Rinse the screen with water and let it dry again. To prevent ink from leaking, seal the edges of the screen with duct tape. Once you’re set, position the screen on the material you want to print.
Pour ink onto the screen and use a squeegee to spread it evenly, pressing from top to bottom for even coverage. After printing, use a heat gun to speed up the drying process. Finally, clean the screen with water so it’s ready for the next use.
Screen Printing Example
One of the best things about screen printing is that it works on just about any surface. This means you can create all sorts of unique and interesting souvenirs, like t-shirts, bags, umbrellas, hats, pouches, and mugs.
You can choose any of these items to add your screen-printed designs, making them stand out as special and memorable keepsakes. It’s also an excellent way to enhance branding, especially for corporate gifts.
Now that you’re familiar with the tools, materials, and process of screen printing, you might find it’s not as complicated as it looks. Screen printing is actually quite straightforward and versatile, making it a great option for creating memorable souvenirs. The clear, long-lasting prints it produces ensure these items can be kept for a long time.
Why not use screen printing to make standout promotional t-shirts? At Studiokado, you can get custom t-shirts with your brand logo, made from high-quality, comfortable materials that are perfect for office merchandise.
Also Read:

Brew Me Tea - La Vie En Rose
Exotic tea flavor
Oaken Lab - Daily Foaming Face Wash
Refresh and Revitalize Your Skin
Ring Stand Wallet (Black)
Pocket-Friendly Wallet Meets Versatile Stand
